
Create your own Exercises using the vLab and CORE
Going through readily provided exercises in the vlab e.g. during the ilabX – The Internet Masterclass course on edX is already cool and provides you with a lot of experience on how the Internet works. However, it is even cooler that you can use the vLab and CORE to create your own network exercises in a virtual environment to share with others!
This page gets you started with doing exactly that.
Resources for developing CORE setups
You can find basic resources on how to download and install the vLab as well as basic interactions with CORE setups under the vLab button in the menu bar of this page.
There is a lot more to CORE than what we cover here, have a look at their documentation if the intro below is not sufficient. However, we slightly modified CORE, so that each host always has a separate file system once started, which is deleted/reset when the setup is stopped. The vanilla CORE uses a shared file-system between all hosts. It also offers options to specify files or folders for each host that should not be shared, but that comes with some disadvantages, therefore our adaption.
- Official CORE documentation:
- Architecture:
- Brief overview about how CORE works.
- Installation:
- If you want to install CORE on your machine.
- This is the official version of CORE, without our changes to the file-system. Prefer the vLab installed version.
- Using the GUI:
- Probably the most relevant part.
- Provides an overview about the CORE interface and available options.
- Services:
- Highly relevant for configuring your setups behavior.
- Note that creating new services is not recommended (as those are not stored in the single setup save file). Instead you should adapt the UserDefined service with your changes (more on that later).
- Architecture:
The most relevant aspects are also summarized below, but definitely have a look at Using the GUI and Services before starting to create your own setups.
Properties of CORE
Core can be used to emulate lots of different scenarios, but has also some shortcomings compared to real hardware. In this section you can find the most relevant points. In case you play around and encounter cool things you can do or also things that don’t work let us know, then we’ll update this section.
What CORE can do:
- Emulate multiple Linux hosts and routers
- Interact with them from the host (vLab) over terminal
- Run (network) services on each host (e.g. DHCP, DNS,…)
- The initial file system is the same as the vLab system
- After starting each host has its own copy of it
- We changed this from the default CORE behavior: by default all hosts would still share the same file system, changing a file in one host would also change it on all other hosts if not explicitly declared differently in the setup file.
- After starting each host has its own copy of it
- Supports both IPv4/IPv6 connections between hosts
- Supports Wireshark as graphical network traffic analyzer
- You can easily watch what goes over any interface of any emulated host
- Just right-click on a running node and select wireshark->desired interface to capture
- Manipulate network properties like bandwidth or loss for any link
- Just double-click on any link to open the config for that link
What CORE can do maybe:
- Access the Internet from a CORE host
- It is possible but requires NAT configuration of the vLab and a specific setup. We might provide instructions in the future.
- If you need this drop us a message.
- Use software with a graphical User Interface
- Working with the terminal works perfectly fine
- See the Tipps when creating CORE setups section regarding how to use e.g. Firefox
- Run software you install
- If you install software in the vLab before starting a CORE setup, it will also be available on all CORE hosts
- Remember that GUI based tools will likely not work out of the box, so prefer tools that work over the terminal
- Virtualization software like docker likely works
- There is support for docker in CORE, but the setup might have some errors
- Could also be that our changes with the (persistent) file system leads to issues with this
What CORE can’t do:
- After starting a setup no hosts or links can be added
- That means you need to provide all hosts and links in the setup
- You can emulate missing cables by setting the connected interfaces down on startup. Then plugging in a cable equals setting those interfaces up.
- Emulate different Operating Systems
- In the vLab you are limited to the OS that also the vLab runs, which is based on debian. So no Ciscio specific OS for routers or windows/Mac.
Are there examples?
Yes! Check the /home/ilab/iLabX/Setups folder in the vLab. There you can find all the setups we actually created for the MOOC (The Internet Masterclass), e.g. week1.imn for the setup of week1. You can simply use CORE to open that file and get the setup for part 1 of the course. Under the hood the VCC does exactly that when opening a setup for a part of the MOOC.
IMPORTANT: The directory /home/ilab/iLabX is automatically reset sometimes on purpose, as it contains ilabx MOOC specific files that should not be changed manually. Save your own setup files in another directory! Otherwise they might get deleted.
This also shows that CORE saves setups as plain text files that can be viewed/edited with any editor.
Open and save CORE setup files
You can create a new setup (in CORE: File -> New) or update/edit an existing setup file (in CORE: File -> Open -> Select the .imn file you want to open).
We recommend that you create a new file for a new setup and then continuously update it while you create/polish your setup. Don’t forget to save from time to time, as CORE doesn’t auto-save the setup. You can put your setup file e.g. in a git repository to easily track changes and roll back to an earlier version if you mess it up. This also allows easier collaboration if more than one person works on creating a setup.
The following code block shows a simple snippet of a config file, the configuration of a single host named n1 with one network interface and an IPv4 and an IPv6 address (and no other configuration):
node n1 {
    type router
    model host
    network-config {
	hostname n1
	!
	interface eth0
	 ip address 10.0.0.10/24
	 ipv6 address 2001:0::10/64
	!
    }
    canvas c1
    iconcoords {36.0 103.0}
    labelcoords {36.0 135.0}
    interface-peer {eth0 n2}
}
The last line interface-peer shows that eth0 is connected to node n2 over a link.
Basically a .imn setup file contains an entry like the one above for each host/router in a setup, with additional configurations like e.g. setup scripts that should be executed on the according node when starting a setup (not part of the above example). More on those configurations later.
Also note that the setup file only describes the initial setup. Any changes that you do to a running setup (e.g. over the console) on different hosts is NOT reflected back to that file, even if you save it in CORE while the setup is running. If you of course e.g. rearrange hosts or add/remove them, and then save the setup, the file is updated with those changes.
Create and edit CORE setups
Add or remove hosts and links
Core offers different node types that can be added to a setup. The example below shows how to e.g. add a new host (=endhost, not a router).
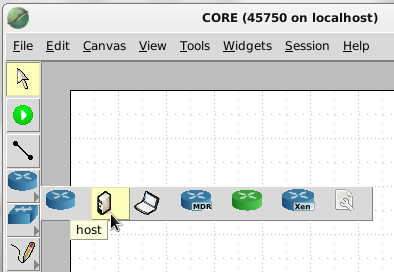
In the menu to the left press the router symbol and then select the node type you want to add. The most relevant ones are the ones on the left:
- router, hosts and PCs
Aside from a different symbol they have different initial configurations, but those can be easily adapted. So in theory, you can use any node for any purpose. We recommend to use hosts for end hosts with just one interface and routers for routers that connect multiple subnets.
To add a node to a setup, you can simply select the desired type, then click in the CORE GUI where the node should be placed and voila, you added a new host.
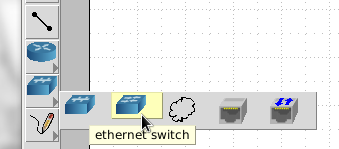
Using the menu icon below the nodes icon, you can find basic/link layer network elements like switches or hubs:
The RJ45 connector allows connecting a setup with the real world network (e.g. the Internet), but requires configuration not just in CORE but also the vLab (NAT, forwarding, routes). See e.g. http://coreemu.github.io/core/usage.html#rj45-tool for more info. If needed for the ilab, drop us a mail and we can try to support you with getting it running.
Last but not least, nodes can be connected using the link tool. The image below shows a small sample setup consisting of 3 hosts, a switch and a router connecting the two subnets used:

In the menu on the left one can see the selected link tool. Once selected, connections can simply be drawn between two nodes as needed. CORE automatically adds IP addresses to hosts and creates a separate interface for each connection to a host.
Basic configuration of hosts and links
After creating a basic setup it can already be started. However, usually you want to apply some additional/initial configuration to different hosts. For example configuring one host as DNS server, configuring routing on the routers, etc.
Now back to the configuration of a setup. Double clicking on any host shows the basic configuration settings for it:
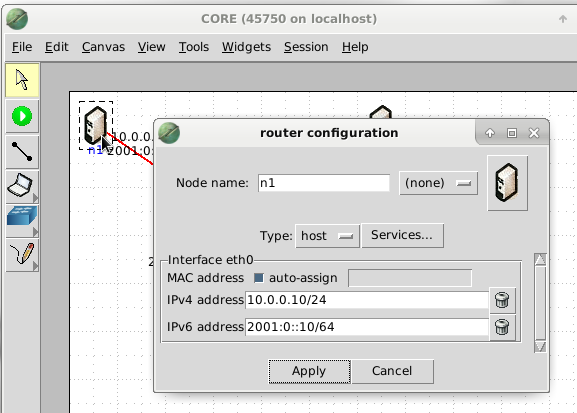
Here you can change the node name (which also is the hostname of the node when running the setup), the MAC address (auto-assign is usually fine) and the IPv4/v6 addresses that were initially set by CORE.
In theory also the icon of the node can be updated, but as they are not included in the setup file it is recommended to not use custom images here. Otherwise sharing the exercise gets harder, as more than just the config file has to be exchanged. Better stick to the default icons.
You can also change the type of the node here, but that is usually not required, as you can just pick the right node when adding it to the setup.
In the end, the type of a node only determines which kind of services are enabled on each node by default. Those can be seen by clicking on the Services button in the configuration dialog where the settings can also be customized.
Configuring node behavior using (custom) services
Services can be used to configure hosts (e.g. enabling IP forwarding on startup) and are unique per node. That means if you configure a service on node n1, it is not automatically configured on n2. If a service is needed on multiple nodes, it has to be configured for each desired node separately. The configuration can also differ from node to node, depending on the service.
The service overview looks as follows:
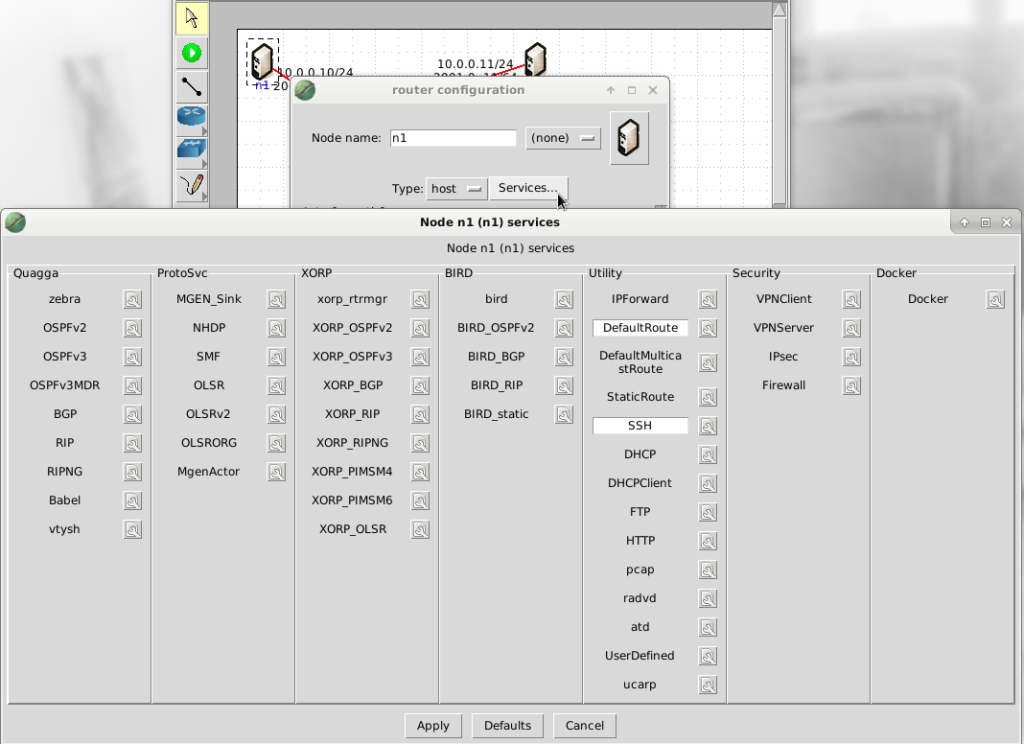
Services are grouped roughly by purpose (e.g. quagga for routing, etc.). The most relevant for us is the Utility group.
Each service has a clickable title to disable/enable it and can be further customized. In the example above, e.g. the DefaultRoute and the SSH services are enabled. For nodes of type router, some services from Quagga are enabled by default. However, routing doesn’t work out of the box and has to be configured manually anyways. Therefore our recommendation is to just disable the default routing services and setup routing on your own in the UserDefined Service (see later) or the StaticRoute Service.
The image below shows the default configuration for the StaticRoute Service:
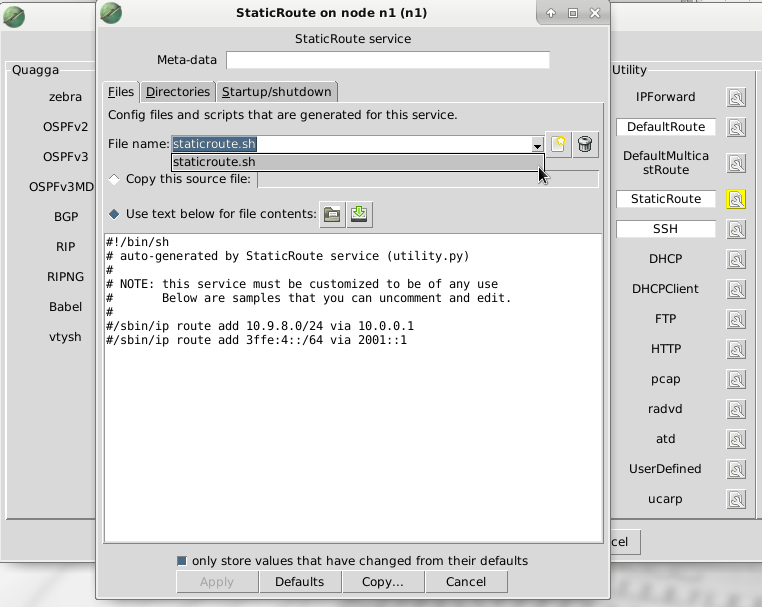
The service has one script (here staticroute.sh) with no content for now (except some example comments). Adding a static route is as simple as adding commands to the script. For example one could add the following static route:
ip route add 2001:1::10 via 2001::1 dev eth0Starting the CORE setup after saving/applying the new config will show the route in the routing tables.
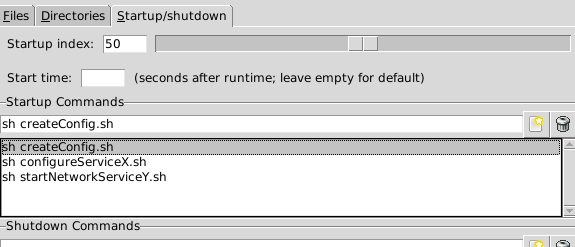
Note that scripts like the staticroute.sh script are not executed by default but need to be defined in the Startup/shutdown tab (which is already done for the StaticRoute service):
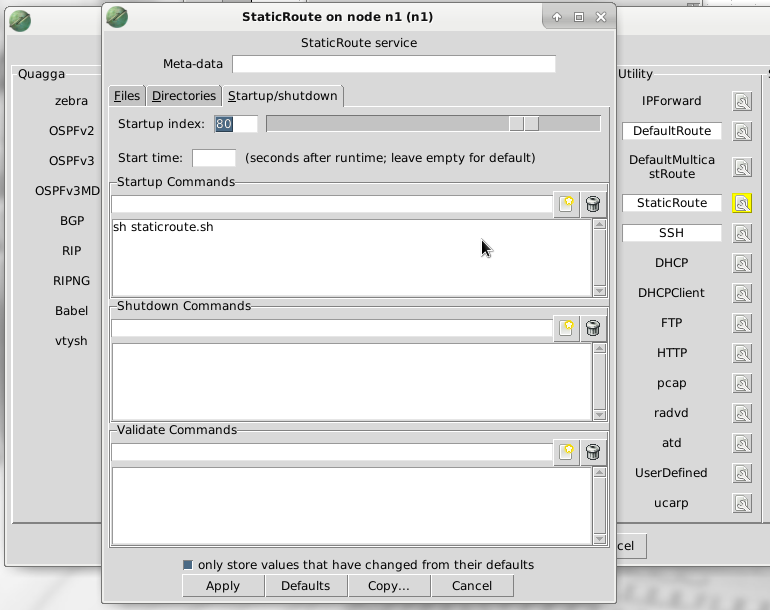
Here we tell CORE to execute sh staticroute.sh when the setup is started. We could also define commands directly here without using a script file, e.g.:
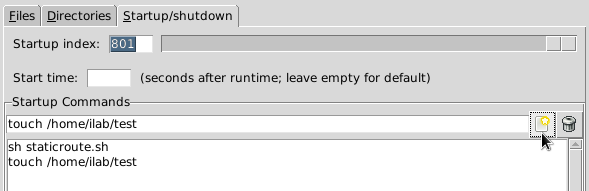
To add startup commands simply write the command in the Startup Commands line and click the add button (see cursor). Then the command is added to the list of executed commands below. Make sure you have no typos in the commands 😉 .
You might have noticed that there is also a Directories tab. As the file-system is shared between all nodes in the default CORE implementation, here it would be possible to specific folders that are NOT shared. However, as we changed CORE so that all nodes always have their own overlay file-system, you can simply ignore the directories tab.
If the setup is saved, those changes also show up in the configuration of n1 in the .imn file:
node n1 {
    type router
    model host
    network-config {
	hostname n1
	!
	interface eth0
	 ip address 10.0.0.10/24
	 ipv6 address 2001:0::10/64
	!
    }
    canvas c1
    iconcoords {27.0 34.0}
    labelcoords {27.0 66.0}
    interface-peer {eth0 n4}
    custom-config {
	custom-config-id service:StaticRoute
	custom-command StaticRoute
	config {
	files=('staticroute.sh', )
	startidx=801
	cmdup=('sh staticroute.sh', 'touch /home/ilab/test', )
	}
    }
    custom-config {
	custom-config-id service:StaticRoute:staticroute.sh
	custom-command staticroute.sh
	config {
	!/bin/sh
	ip route add 2001:1::10 via 2001::1 dev eth0
	}
    }
    services {DefaultRoute StaticRoute SSH}
}
In addition to the previous time we looked at this example, we see that we have the DefaultRoute, StaticRoute and SSH services enabled at the bottom of the n1 config. For the StaticRoute service, we also see a custom-config, which contains the filename and commands to be executed by that service on startup, as well as another custom-config object that contains the staticroute.sh script. Those scripts/services can also be edited in the setups .imn file directly if you prefer that way (don’t forget to reload the setup in core after saving).
Also note: By default CORE only saves those things to the config that differ from the default config. So for example for the SSH service we don’t see the startsshd.sh script that is used by the service in the .imn file, as CORE can auto generate it when loading a setup, as long as it remains unchanged. If we change the startsshd.sh script in the SSH service, it would also be included in the .imn file.
Useful default services
There are some useful default services that can be used directly or need only minor adaption:
- IPForward:
- Enables forwarding on routers.
- No additional changes required aside from enabling the service.
- DefaultRoute:
- Sets a default gateway to connected routers.
- Usually no additional changes required aside from enabling the service, but makes sense to check if the detected defaults make sense.
- StaticRoute:
- As seen before, this service is meant to group configurations of static routes.
- Needs to be adapted with the concrete routes one wants to set, by default the service does nothing.
- Makes usually sense to enable it together with IPForward, as without forwarding, routing doesn’t do much 😉
- SSH:
- If you want to access the different hosts over ssh in the running CORE setup this starts a ssh server on the nodes where the service is enabled.
- radvd:
- if enabled this service starts a router advertisement daemon on the according host. This enables e.g. announcing prefixes for SLAAC in IPv6.
- Adapt e.g. the distributed IPv6 global prefix as needed.
- …:
- e.g. DHCP if the IP addresses should not be statically assigned,…
- e.g. HTTP for a basic webserver skeleton
However, the most important service for creating new setups is the UserDefined service. Here one can group all configuration that doesn’t fit in any of the previous services.
In theory it is possible to create new services for CORE, which can be added to the service overview and just be enabled/disabled there. However, this has the disadvantage that those services are not part of the .imn file and therefore cannot be easily shared (or at least require a more complex sharing process including multiple files and setup instructions for users not familiar with CORE). Whenever possible we recommend to do nothing that requires the users of the setup to anything aside from opening the .imn file and maybe installing some software before starting the setup.
In theory you can define files in the file system like:
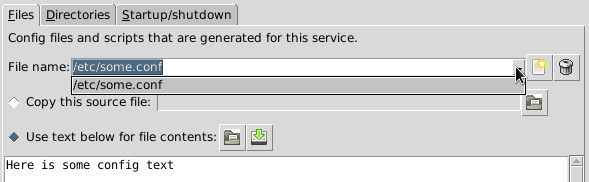
However, this requires that the affected folder (/etc in this example) is specified in the Directories folder as unique, which also deletes all content in that folder that was there previously (and we don’t want to have a wiped /etc folder….). Therefore you can do that for folders where it doesn’t matter as you define all the files in it (e.g. /etc/someService/), but not for folders where you want to keep the default files in it.
For those you can just create the required files from a script, e.g.:
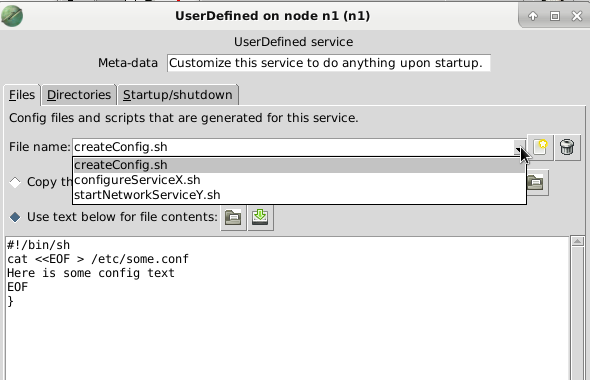
The example shows how to use cat from a script to create the file /etc/some.conf with the given content. It also shows that multiple scripts can be created for each service, meaning you can create a different script for each config/etc. you want to setup on startup. Just remember to also execute the scripts at startup of the setup:
Last but not least, if not clear so far: basically the difference between different services in CORE is just which scripts/commands they execute or files they create. In the end everything could be done in a single service, but splitting it up makes the whole process more modular.
Manipulating links between nodes
It is also possible to change the properties of a link between two nodes. When double clicking on a link, you can configure e.g. bandwidth, delay, loss, etc. for that link:
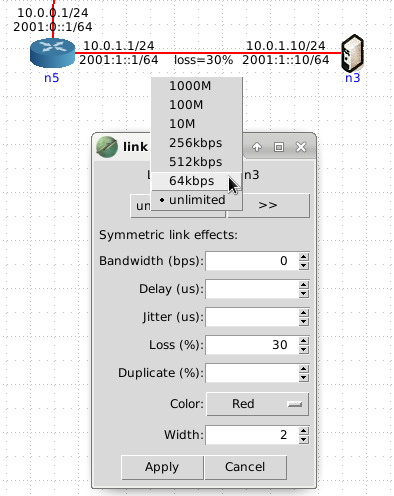
As with the host specific changes, saving the setup after adapting a link config also persists the changes to the .imn file.
Cool feature: Adapting link properties is also possible at runtime, so you can tell participants to do e.g. a measurement, adapt the link bandwidth and then repeat the measurement.
Installing additional software for setups
Ideally everything required for a setup is contained in the .imn file that defines the setup. However, there are some things that cannot be included in the .imn file:
- Additional software:
- If a setup requires software that is not pre-installed in the vlab it has to be installed in the vlab before starting the setup. Afterwards the software is available on all nodes in CORE.
- Make sure to provide clear instructions what to install to users in addition to providing the .imn file.
- Files shared between all hosts:
- If you require e.g. a file to be shared between all nodes in CORE, you also create it in the vlab before starting a setup. However, its preferable to include such things in the setup .imn file.
Tipps when creating CORE setups
- Provide a sufficient skeleton for the users (all hosts added, links exist, hosts configured with the relevant basic configuration)
- People should not have to worry about configuring CORE, instead just start the setup and go through your exercise
- E.g. When the exercise is about DNS, hosts should be configured with IP addresses routing/forwarding should work already, etc. People should be able to focus on the exercise part, e.g. DNS
- Create a fully working setup first
- Then remove the parts that the people doing the exercise should add during the exercise.
- This way you create a sample solution and a exercise setup at the same time and know that the final setup works as expected.
- The routing services for routers (quagga, ospf) don’t work out of the box
- Either debug and adapt the default configurations accordingly,
- or disable the dynamic routing services and just configure static routes.
- While you cannot tell participants to add links between nodes at runtime, you can do the following:
- Add the link in the setup.
- Disable the corresponding network interfaces on the affected nodes at startup.
- -> This way the setup behaves as if there was no link and if needed later the participants can just enable the interfaces again.
- You can directly edit the .iml file of your setup with a text editor of your choice.
- This way you can e.g. fine tune the positioning of elements in the setup file (directly set all X/Y coordinates of hosts to the values you want).
- Or do a config for one host and then copy it to other hosts without having to handle it in the CORE GUI .
- If your setup needs the user to open a browser on one of the emulated hosts:
- use corefox (alias for firefox, works als on core hosts)
- Only works if you execute the following on the hosts (best in the setup at startup):
- mount -a
- mount -t tmpfs tmpfs /dev/shm
- If firefox crashes -> Just try again
- Make sure to provide instructions what else needs to be done aside from starting your core setup
- e.g. install specific software before running the setup so that its available on all hosts.
© Stefan Liebald