
Linux Terminal Introduction
Overview
This unit provides you with a short overview over the Linux Terminal and file system. We have a look at the following things:
If you are already familiar with Linux and terminals you can just skip over most of this section and continue with the next units. However you should have a look at how to edit files, where we give an example of how to open a graphical text editor on a CORE host.
This unit covers the basics. If you want (or need) to know more, feel free to google for Linux terminal tutorials (specifically we use fish as terminal, but the general commands are the same)
Motivation:
Using the vLab you will mostly interact with CORE and the vLab using the Linux terminal. As seen before, double clicking on a host in the vLab opens a terminal that is connected to that specific host, which can also be repeated multiple times, if multiple terminals are needed.
In the vLab itself you can open a terminal by simply clicking on the terminal symbol in the menu at the right side of the screen.
In this section we provide you with some basic information how to:
- navigate through directories,
- edit files
- start graphical applications on CORE hosts using the terminal
- and some more basics
Throughout the other Parts of the edX iLabX course you will learn more commands, e.g. for configuring the network, enable routing or creating a firewall. We will cover these commands once they become necessary, meaning you don’t have to be a Linux master from the start on.
First Look:
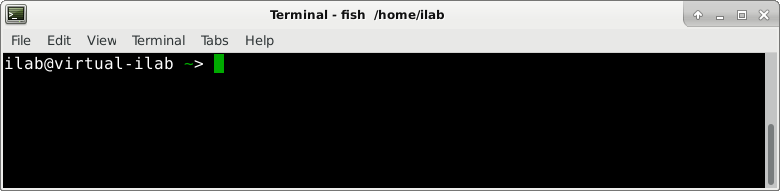
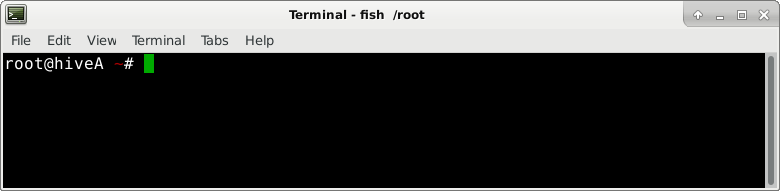
Following we can see two terminals just after starting them. They look slightly different, since the first one was started in the vLab and the second one by double clicking on a CORE host.
The structure of the line we see is always the same:
- First we see the user you are logged in as (ilab respectively root)
- then the machine the terminal is connected to (here the virtual-ilab or the hiveA host of CORE in the setup of Part 1).
- So overall each terminal line always starts with “<user>@<Hostname>~>”
After starting/opening a terminal you can type your commands, where we’ll cover the most important commands in the next parts or the according Parts of the edX course.
Access rights:
You already saw the root user above, which has a special role. In Windows one could compare him with an administrator, having access to all kinds of files/services normal users (like the ilab user) don’t have.
During the lab we often will change files that normal users can’t access. Luckily the core terminals are always logged in as root, allowing you to do basically anything you want (including damaging the vLab system, so be careful what commands you execute as root user!). Also note that working as root user is a bad idea, but for this course we do it for simplicity.
In case you need root privileges in the vLab, you can get them by typing the following command in the terminal:
sudo su
Afterwards you should have root access. However, usually you might just use
sudo <command>
This just executes the <command> with root privileges without changing the actual user.
It might happen to you that you will be asked for a password throughout the lab for the user ilab. In that part you can use the following:
- user: ilab
- password: ilab
Linux file system structure:
The Linux file system is built like a tree, where / is the root directory (meaning the top level directory), which has multiple sub-directories.
The image below shows a common structure of the filesystem.
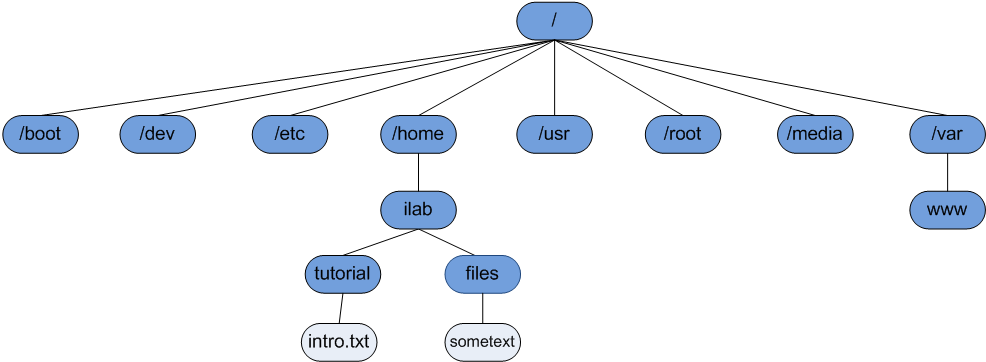
The dark blue boxes are (sub-)directories, the light blue ones files (intro.txt and sometext). Note that files don’t need to have a file extension like “.txt”. A directory can contain both files and sub-directories.
Some example directories:
- /home/ilab: The home directory of the user ilab. When starting a terminal as this user you usually start here. Usually you can access all files in here with the users normal access rights.
- /root: The home directory of the root user. When starting a terminal as root you usually start here.
- /boot: Contains files/sub-directories required for booting, so do not touch them :).
- /var/www: Contains files/sub-directories related to webservers. We use files here in Part 5.
- /etc: Contains files/sub-directories related to various stuff. You will use files in this directory quite often.
- …: And many more.
In the above picture the file intro.txt would have the full address /home/ilab/tutorial/intro.txt. Using this full address we can always access the file.
However, the terminal also supports relative addressing. That means you can navigate to a certain folder (e.g. /home/ilab, the default when starting a terminal as user ilab) and just use tutorial/intro.txt as address.
Notice the missing /. Addresses beginning with / are always absolute, from the root level of the tree independent of where you are in your terminal. Without / you current position is automatically prepended to the address by the terminal to get the full address.
Navigation:
Let’s have a brief look at the different commands you need to navigate around in the terminal. By default you are in your home directory when starting a terminal (/home/ilab or /root).
You can use the following commands to move around, and get an overview of files/sub-directories:
- ls: list all files in your current directory. You can also use e.g. ls <address> to get a list of all files at the given address in the filesystem. With ls -l <address> you can get a nice list format.
- cd <directory>: change your directory in the terminal. Examples:
- cd /etc: to go to /etc
- cd tutorial: to go to /home/ilab/tutorial if your terminal already was in /home/ilab.
- cd ..: The two dots (..) mean go one directory up, so e.g. from /home/ilab to /home.
- pwd: Print the folder you are currently in.
The image below shows some examples:

You can also see that we had no access rights to the /root directory as user ilab, but when switching to the root user it worked. Alternatively we could have used sudo ls /root.
Handling files:
You can interact with files in numerous ways through the terminal. In the examples below <file> also refers to the address of the file that should be manipulated/read by the command. Again, addresses can be relative or absolute.
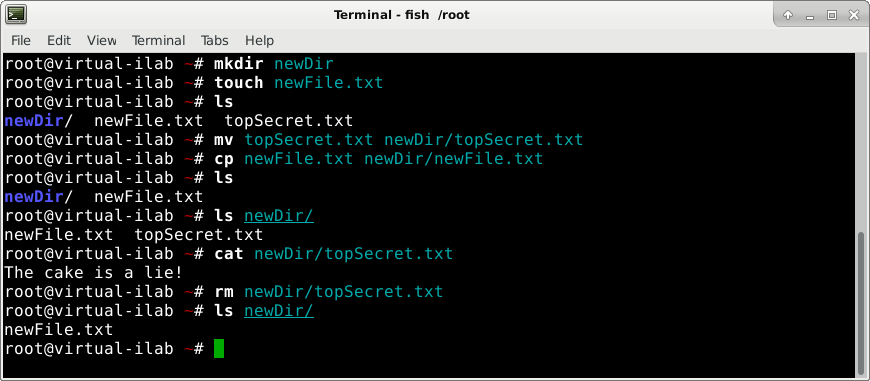
- mkdir <directory>: Create a new directory. E.g. mkdir /home/ilab/vlab.
- touch <file>: Create a new (empty) file at the given location. E.g. touch /home/ilab/vlab/Part0.txt.
- mv <file> <newFile>: Moves a given file to a new position. E.g. mv /home/ilab/vlab/Part0.txt /home/ilab/Part0.txt. Can also be used to rename files by just moving them to the same directory with a different filename.
- cp <file> <newFile>: Similar to mv but creates a copy instead of moving the file. E.g. cp vlab/Part0.txt Part.txt Leaves vlab/Part0.txt and creates a copy Part.txt in the current directory (not vlab/).When copying directories use cp -r <directory> <newDirectory>.
- rm <file>: Deletes (removes) the given file. For directories again use rm -r <directory>. WARNING: There is no trash, what you delete is gone for good!
- cat <file>: Prints the output of the given file to the terminal.
- less <file>: For large files, prints only parts of a file and let you scroll. Exit by pressing q.
Again, the image below shows these commands in action:
Editing Files:
Last but not least you will need to edit files during this course. Mostly you will have to open existing configuration files and adapt them a bit before saving the updated files. Sometimes you might also need to create new files and fill them with text.
We offer you two possibilities to do so (aside from whatever you are already used to and install/use on your own):
- Graphical editor: mousepad
- Terminal based (command line) editor: nano
Graphical text editor: mousepad
The first one is a simple graphical text editor as probably each of you used already (others are e.g. gedit, notepad, …).
From a terminal in the vLab (not CORE!) you can just start it via typing mousepad <file to edit>, where the latter is optional. You can also just open a file in mousepad using File -> Open, which should be self explaining.
However, since CORE hosts do not have a Graphical User Interface (GUI) on their own (they only interact via the terminals) you will receive an error when trying the same on a terminal on a CORE host.
So if you want to use a graphical text editor for editing files on a CORE host, you have to use corepad, which is a command we added. In short it just starts mousepad as editor, but with some tweaks that allows it to run on a CORE host.
To use corepad on any CORE host just type corepad <file to edit> in the terminal of the host where you want to edit a file. You can also just type corepad to open the gui and then use File->Open or File->Save to open or save files on that core host.
Note that by default you have root privileges in terminals on core hosts, which leads to the warning
“Warning, you are using the root account, you may harm your system”
at the top of the editor. You can ignore this warning, it is normal in our use case. After editing files don’t forget to save them (ctrl+s or File->Save or File->Save As (if you want to save the file under a different name))
Terminal base text editor: nano
An alternative to a GUI based editor like mousepad is to use a command line editor like nano, which would also be more realistic when e.g. administering a real world network and connecting to remote hosts over the network using e.g. ssh.
Using nano you can open (text) files inside the terminal and edit them without an GUI. This means you can start it directly in the terminal in nano and also use e.g. sudo nano to edit files that require higher privileges.
The absolute basics:
- open with nano <file>
e.g. nano /etc/hosts results in the following picture
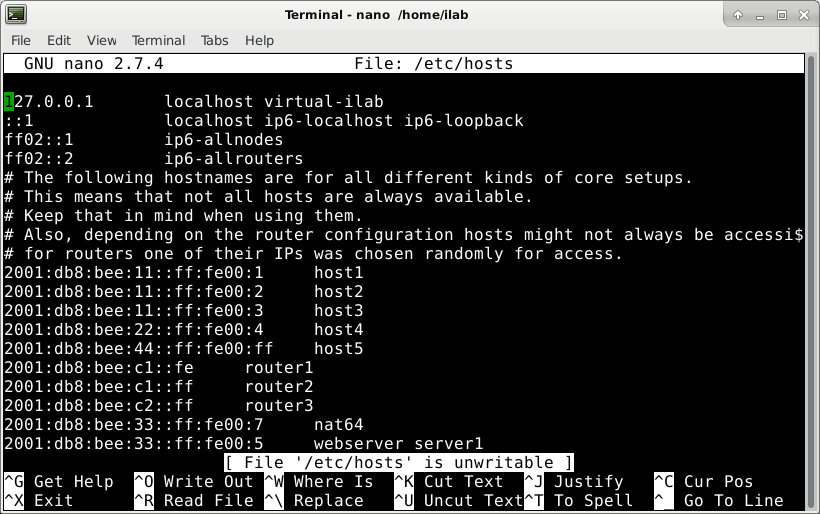
- first line show the program version and currently open file
- main part of the screen is the file you are editing – start typing and it will change at the current cursor
- third to last line shows current status or status of last command – pay attention to those as they often show/explain if/what went wrong. ^<Symbol> always means press ctrl + <symbol> to execute that command.
- last two lines show commands depicted as ^X Exit – to exit back to the terminal you have to press Ctrl + x
- these commands change depending on context, e.g. when exiting it would ask you to save your changes, pay attention to those questions, you have to answer them
- ^O Write out is functionally equivalent to saving the file
- consult ^G Get Help for more commands then the ones shown here
Explaining nano is out of scope of this course, but you should google for some “basic nano tutorial” if you are not familiar with nano. We propose to have a look at the tutorial at howtogeek.com.
Other popular command line editors that you can use are e.g. vim or emacs (not pre-installed). If you have a favorite command line based editor just install it in the vlab before starting a CORE setup. It will then also be available on all CORE hosts.
Good to Know:
Some tricks when working with the terminal:
- Manpage: Manpages are the user references for all kinds of commands (including those above). Whenever you are not sure how to use a command try looking at its manpage by using man <command>, e.g. man ls. This will become especially useful once you need to use additional parameters for a command, which are described in the manpage of the command.
- Copy Paste: You might notice that simple ctrl+c/ctrl+v for copy does not work in the terminal. In order to copy text select it and press ctrl+shift+c. For pasting text into the terminal press ctrl+shift+v. As alternative you can also mark the text you want to copy and press the middle mouse button to copy it. Or select the text, right-click -> copy, right click destination ->paste.
- History: The terminal remembers your last typed commands. Just use the Arrow-up/Arrow-down keys on your keyboard to check the last commands you used and press enter to execute them again. You can also type history in the terminal to get a printout of your history.
- Auto-completion: The (fish) terminal supports auto-completion. Whenever you type a command you can type tab to try if the terminal can finish your command (e.g. from /home/i<tab> to /home/ilab). In addition when fish shows you a proposed continuation based on your history (light gray), you can press ctrl+arrow-right one or more times to follow this proposal.
- Killing an application: Whenever your terminal or an application/process running in it seems to be crashed you can try to press ctrl+c to kill it. This is similar to alt+f4 in windows.
- Don’t like fish?: If you do not like the fish terminal feel free to use any terminal of your choice. You can e.g. start a bash terminal by simply typing bash in the terminal.
You know more tricks? Let us know, then we can extend this list.