
The CORE network emulator
This page gives you some insights in the framework that we will use to build a small copy of the Internet together on your computer. It gets a bit technical, so do not worry if you do not understand every sentence here now. Throughout the course everything will become clear to you and you can come back to this page any time if you want to know more.
Working with the CORE network emulator:
As you should know by now you can open specific setups for the different learning units (Parts) using the VCC. This opens the CORE network emulator GUI and loads the selected setup, in the following example for Part 1:
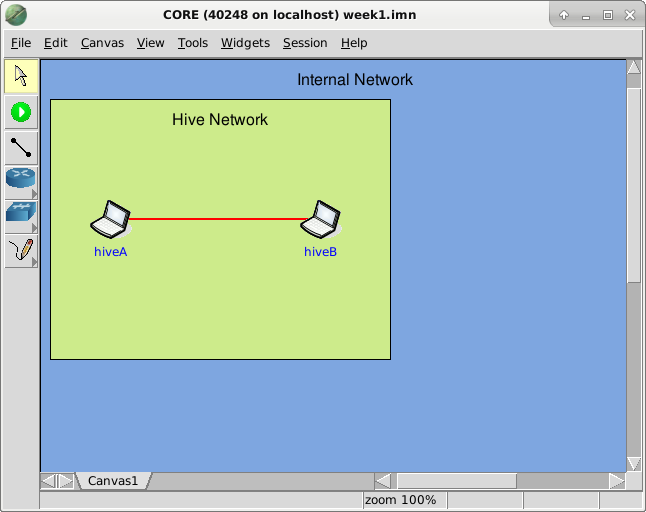
In the main area in the middle you can see the nodes of the setup for the according Part. In addition red lines depict how they are connected to each other. You can think of them as Ethernet cables connecting the different hosts.
In later Parts we have more hosts which are connected in a more complex topology. Each host also has some internal settings, which we configured to fit the tasks for each Part. For example in Parts 2-3 there will only be basic routing and network configuration and your task is to configure it properly. Later Parts already have these things pre-configured (not necessarily in the same way you do it your own, so it doesn’t help you much to look at these configurations to solve earlier labs).
Aside from the buttons/actions explained below, you do not need any of the CORE specific buttons/menu items.
Most of them are related to creating and configuring new setups, which we already did for you. The only things you need to do is:
- Start a setup
- Change what is being displayed in the setup
- Interact with a running CORE session
- Stop a setup
If you are interested you can play around with the other settings. Just make sure not to save the changed setup. This could make the lab unusable for you. You can just close and reopen CORE if you accidentally tampered with the initial setup but didn’t save it.
Starting a setup:

When opened in CORE, the setups are not running yet. You need to start them manually. You can do so by simply clicking the run button on the left side.
Afterwards you should see green boxes around all hosts for a few seconds, which indicates that the individual hosts are getting started:
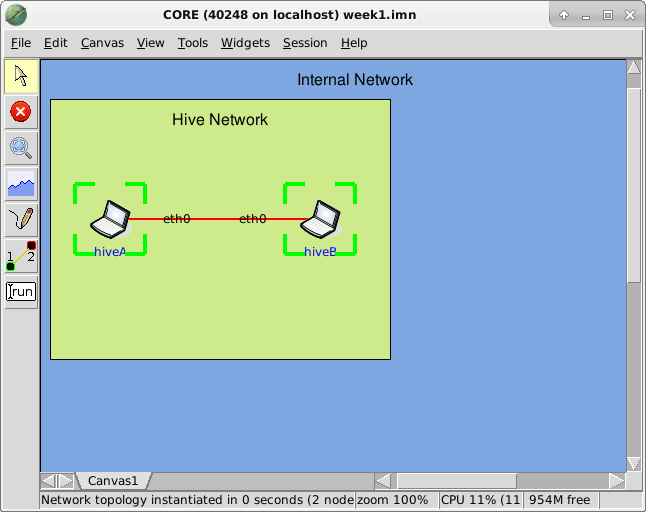
After starting a setup wait for a few seconds until the green boxes are gone (and maybe a few more to make sure everything is ready :)).
Then you can continue actually working with the setup and follow the instructions of each Parts lab.
Important to know:
- Each host (thing with the green square around above) in CORE has the identical file system and software installed as the vLab had at the time of starting the setup.
- That specifically means that if you want to use software that is not pre-installed, just install it in the vLab before starting the setup. Afterwords it should also be available in CORE (See the Linux Terminal Introduction page for more details).
- After startup each host in CORE has its own filesystem. Changes you do on one host (create/edit files) are only done on that host.
- Saving a setup does NOT save changes you did on the hosts during a lab. However it can prevent updates to the lab from our side (e.g. bugfixes), so try to never save a core lab.
- When stopping a setup, all changes you did (files, configuration commands,…) on any host in the setup are lost. The advantage is that you can easily reset the setup in case you did something wrong and do not know how to undo it.
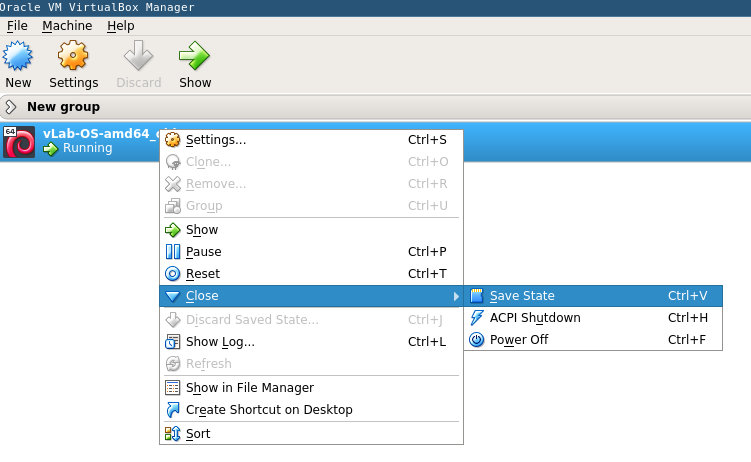
- If you want to stop working on a lab and continue later you should leave CORE running and save the state of the vLab using Virtualbox:
- in VirtualBox rightclick on the vLab -> close -> save state (See picture below)
- When restarting the vLab later it will have the same state it had when closing it, including the running CORE session.
Change what is displayed in CORE:
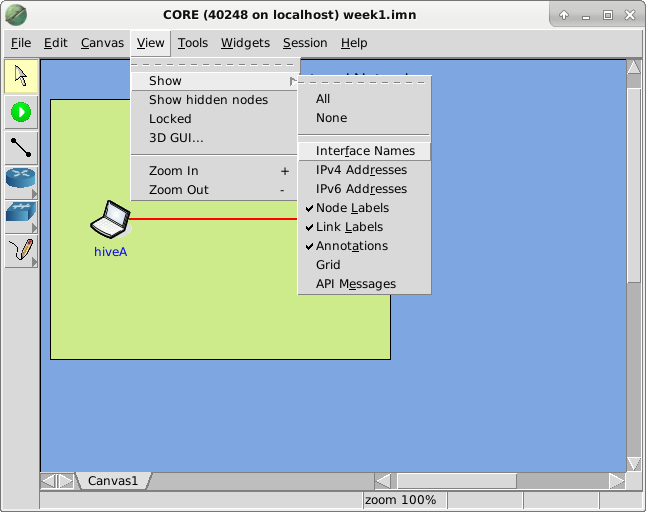
One thing you might want to do directly in CORE is to change which information about the setup is actually displayed. By default our setups only show the hosts, host names and connections between hosts. However, you can display additional information like:
- Interface names of each host (You will learn about interfaces in Part 1/2)
- preconfigured IPv4/IPv6 addresses (You will learn about these addresses in Part 2/3). Note that this doesn’t include IP addresses you configure yourself during the labs.
- Labels of nodes (=hosts) and links (=connections between hosts)
- and some more.
The image below shows how to do so:
Since IPv6 addresses are quite long you probably only want to show interface names when helpful. This can help you e.g. see on which interface of a host you want to start wireshark (see wireshark introduction).
The Image directly above shows the Interface names disabled. The image two above had them enabled.
In addition you can use the Zoom In and Zoom Out to in-/de-crease the size of the setup in CORE.
Again, aside from these options you won’t need other things from the CORE menu and should just ignore them.
Interacting with hosts in a running setup:
Now that you have your setup running, you usually have a task that tells you to do something on one of the hosts, e.g. execute a command or edit a file.
By default every interaction with hosts in CORE happens through terminals (see our Linux terminal introduction). Opening a terminal on one of the hosts in a setup is easy. Just double click on the host you want the terminal for after starting the setup.
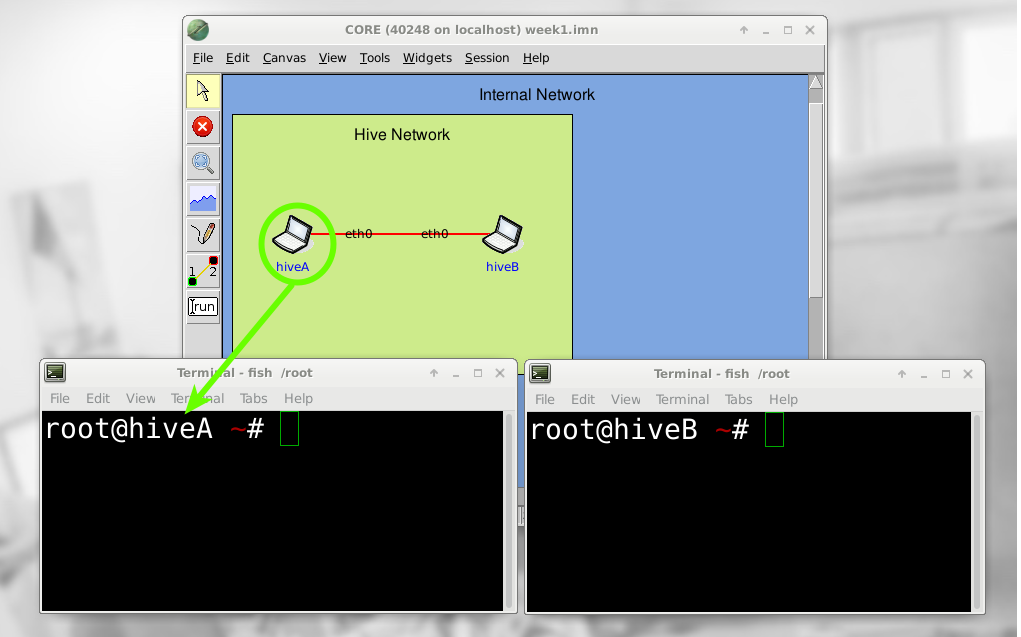
As you can see in the example above, double clicking on the laptop named hiveA opened a terminal that also tells us that it is connected to hiveA. The same was done for hiveB. A terminal in the vLab would have the text “ilab@virtual-ilab” as text.
Typing commands in these terminals executes them directly on the host the terminal belongs to. Again, more information about this can be found in the next unit about Linux Terminals.
Stopping a running setup:

Last but not least you might want to stop a setup after you are finished. You can do that by clicking on the stop symbol in CORE.
This will stop the running session. It also closes all open terminals connected with hosts in the running CORE setup.
Again, remember that stopping CORE resets all changes you did during the runtime on the hosts. You should only use this option when you are finished with a lab or when you want to reset it!
In case you want to make a break it is probably better to save the current state of the vLab as described earlier. This allows you to keep the CORE session running during vLab restarts.